Monday, February 23, 2009

Daisy, Daisy

Another freebie, in my quest to make all my free patterns more widely accessible on Ravelry - and to everyone who reads this blog :)

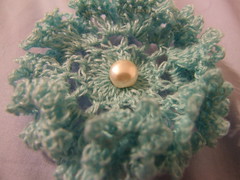
I designed this little flower as an ornament for a Christmas parcel, at a friend's request. I liked it enough to submit it to SlipKnot, the journal of the Knitting and Crochet Guild.

You could also use it as an embellishment on a hat, bag, cushion etc, or attach a hair-slide or brooch pin to the back. It also works pretty well as a pen topper, but you may need a dab of glue to help it stay in place, depending on your gauge.

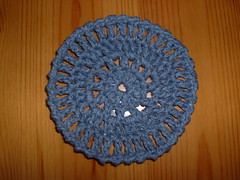
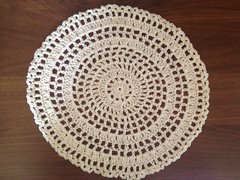
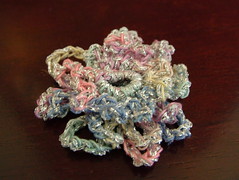
It's worked by crocheting twice into the same round - once into the front loops, then back round again into the back loops. You can create a bigger flower if you wish, by adding 4ch to the loops of each extra odd-numbered round, but the back of the flower does become quite thick, quite quickly.

DAISY, DAISY

Daisy, Daisy


MATERIALS

Use any thread or yarn and an appropriately-sized hook to the yarn or thread you use. The size of the decoration will vary with the size of the fibre used.

For the example illustrated (about 2"/5cm diameter), I used a size 10 crochet thread held together with a strand of Twilley’s Goldfingering in Silver, worked with a 4mm (G) hook.


ABBREVIATIONS

beg - beginning
ch – chain
ss – slip stitch
sc - single crochet
dc – double crochet
FL - front loop
BL - back loop

INSTRUCTIONS - British terminology

Round 1: Ch 6, ss to close

Round 2: Ch1, dc into same space, 7 dc into ring, ss to 1st ch. (8dc)

Round 3: FL only - ss in first FL, ch6, ss in same loop, [ss into next FL, ch 6, ss into same loop] in remaining loops. (8 ch-6 loops)

Round 4: BL only, working into the back loops immediately behind front loops used in previous row - ch1, dc in each BL to end, ss into 1st ch. (8dc)

Round 5: FL only, working into the front loops of the dc created in previous row - ss in first FL, ch10, ss in same loop, [ss into next FL, ch 10, ss into same loop] in remaining loops. (8 ch-10 loops)

Round 6: Rpt row 4.

Round 7: FL only, working into the front loops of the dc created in previous row - ss in first FL, ch14, ss in same loop, [ss into next FL, ch 14, ss into same loop] in remaining loops. (8 ch-14 loops)

Fasten off and sew in ends. Ease petals into shape.


INSTRUCTIONS - American terminology

Round 1: Ch 6, ss to close

Round 2: Ch1, sc into same space, 7 sc into ring, ss to 1st ch. (8sc)

Round 3: FL only - ss in first FL, ch6, ss in same loop, [ss into next FL, ch 6, ss into same loop] in remaining loops. (8 ch-6 loops)

Round 4: BL only, working into the back loops immediately behind front loops used in previous row - ch1, sc in each BL to end, ss into 1st ch. (8sc)

Round 5: FL only, working into the front loops of the sc created in previous row - ss in first FL, ch10, ss in same loop, [ss into next FL, ch 10, ss into same loop] in remaining loops. (8 ch-10 loops)

Round 6: Rpt row 4.

Round 7: FL only, working into the front loops of the sc created in previous row - ss in first FL, ch14, ss in same loop, [ss into next FL, ch 14, ss into same loop] in remaining loops. (8 ch-14 loops)

Fasten off and sew in ends. Ease petals into shape.

Tuesday, February 17, 2009

A Fine Vintage

Sorry this is a day late. I had a lovely but exhausting day on Sunday and so spent most of Monday asleep!

I'm developing more and more interest in vintage knitting patterns, and, as I know I'm not alone in this, I thought I'd share some of my favourite links.

The main things to bear in mind with vintage patterns are that

  • they rarely supply a gauge measurement
  • much of the terminology is different from modern terminology
  • vintage sizes are often much smaller than modern ones!

However, there are plucky souls out there who are decoding the patterns and making them much more accessible for modern knitters.

For the original publications, as well as actual paper patterns and books, I use two online sources of public domain textile books : Project Gutenberg, which has an entire Craft Shelf full of textile books; and the Antique Pattern Library.

There are also individual free vintage patterns available such as those on the Vintage Purls blog, and the 1940s patterns on the V&A website.

Some bloggers have taken on an entire book, or a whole lace sampler, and resolved to decode and rework every pattern for modern knitters. The best that I have come across are FitterKnitter, who is slowly working her way through a book from 1897 called The Art of Knitting, and Kathleen, who is reworking an 1884 lace sampler book. Her notes on antique terminology are very useful, and she explains things very clearly. Both of these bloggers provide charted and written instructions.

Well, that's it from me. Not very entertaining, but I hope it was useful - and next week I will be rested and back to my usual self, fingers crossed ;)

Monday, February 09, 2009

Spokes Coaster

Well, the Ruffled Flower has been a hit on Ravelry - so far it has been favourited 27 times and queued 7 times! OK, so it's no Clapotis, but that's a lot for one of my patterns :)

Comic Relief launched the 2009 Red Nose Day a few days ago, and a UK-based crafting forum called Crafteroo has opened a shop on Folksy to raise money for it. All items have been donated by the crafters, and Folksy has agreed to waive the fees so that all proceeds will go straight to Comic Relief.

I have given permission for all of my patterns to be used to make fundraising items, and I thought it would be useful to reprint here one that originally appeared in SlipKnot, the journal of the Knitting and Crochet Guild.

Spokes Coaster

Spokes Coaster


MATERIALS

To make a coaster 4" (10cm) diameter, I used a small amount of Aunt Lydia's Denim and a 4mm (G) hook. Thicker thread or yarn will make bigger coasters, thinner thread smaller ones. Two thin threads of contrasting colour held together makes a very pretty effect.

ABBREVIATIONS

beg - beginning
ch – chain
ss – slip stitch
sc - single crochet
dc – double crochet
tr – treble crochet


INSTRUCTIONS - British terminology

Foundation: Ch6, ss into first ch to form ring.

Row 1: 3ch to act as first tr, 11 tr into ring, ss into 3rd of beg ch (12 tr)

Row 2: Ch 4 to act as first (tr, ch1), then (tr, ch1) in each tr around. Join with ss to 3rd of beg ch (12 tr, 12 ch1 spaces)

Row 3: Ss into first ch1 space, 3ch as first tr, 2 more tr in same space, (3tr in each ch1 space) around, ss to 3rd of beg ch (36 tr)

Row 4: Repeat row 2 (36 tr, 36 ch1 spaces).

Row 5: Either reverse dc (crab stitch) or plain dc into each ch1 space. (36 dc). Crab stitch gives a neat rolled edge.

Alternative row 5: Ss into first ch1 space, ch1, dc in same space, 3ch, (dc into next ch1 space, 3ch) all the way around to last space, ss into first dc.

Finish off. Weave in ends.


INSTRUCTIONS - US terminology

Foundation: Ch6, ss into first ch to form ring.

Row 1: 3ch to act as first dc, 11 dc into ring, ss into 3rd of beg ch (12 dc)

Row 2: Ch 4 to act as first (dc, ch1), then (dc, ch1) in each dc around. Join with ss to 3rd of beg ch (12 dc, 12 ch1 spaces)

Row 3: Ss into first ch1 space, 3ch as first dc, 2 more dc in same space, (3dc in each ch1 space) around, ss to 3rd of beg ch (36 dc)

Row 4: Repeat row 2 (36 dc, 36 ch1 spaces).

Row 5: Either reverse sc (crab stitch) or plain sc into each ch1 space. (36 sc). Crab stitch gives a neat rolled edge.

Alternative row 5: Ss into first ch1 space, ch1, sc in same space, 3ch, (sc into next ch1 space, 3ch) all the way around to last space, ss into first sc.

Finish off. Weave in ends.

UPDATE: AUGUST 2012

A fellow Raveler asked me if I could work out how to expand the coaster into a doily and, after a certain amount of messing about and swearing, I am delighted to say that I can.

Spokes Doily

I worked this with thread - unfortunately the thickness was not given on the wrapper, but it was equivalent to a fingering weight, or between 3 and 4 ply. I used a 3mm hook. The final measurement was just over 12" diameter, or approximately 30cm. This used 45g/225m of thread (1.6 oz/246 yds).

The instructions are the same for both UK and US terminology, as all you have to do is work round 2 and round 3 from the coaster pattern.

DOILY INSTRUCTIONS

Rounds 1-3: Work the coaster pattern to the end of Round 3.

Rounds 4-7: Work Coaster Round 2 four times.

Round 8: Work Coaster Round 3 once.

Rounds 9-10: Work Coaster Round 2 twice.

Round 11: Work Coaster Round 3 once.

Round 12: Work Coaster Round 2 once.

Round 13: Work Coaster Round 5, or the alternative Coaster Round 5 (which is the version I used).


Monday, February 02, 2009

Ruffled Flower

As promised last week - the Ruffled Flower!

Cobweb flower close-up


MATERIALS


I used about 5gm (50m/55yds or so) of a cobweb-weight cashmere/silk blend, worked with a 2.75mm (C) hook. I used a 1cm (half inch) diameter spherical pearl button for the centre. The flower came out at 7cm (about 3 inches) diameter. Thicker yarn and hooks will produce bigger flowers.

ABBREVIATIONS

ch – chain
ss – slip stitch
sc - single crochet
dc – double crochet
tr – treble crochet


INSTRUCTIONS - British terminology

Row 1: Leave a long end, then ch3, ss to close

Row 2: Ch3 in place of first tr, then 27 tr into ring, ss into 3rd of beginning ch (28tr)

Row 3: Ch4 in place of first tr and ch, (skip next tr, tr into next tr, ch1) to end, ss into 3rd of beginning ch (14 ch-1 spaces)

Row 4: Ch4 in place of first tr and ch, (tr1, ch1) 4 more times into 1st ch1-space, then (tr1, ch1) 5 times into each ch1-space to end, ss into 3rd of beginning ch (70tr)

Row 5: ch1, work 2dc into each ch1-space to end, ss into 1st ch (140dc)

Row 6: ch5, ss to 1st dc, (ch5, ss to next dc) to end, ss to base of 1st 5-ch (140 ch-5 spaces)

Sew in ends, using the cast-on end to sew a gorgeous bead or button into the centre. Attach to a pin, or sew onto a top, shawl or evening bag.


INSTRUCTIONS - US terminology

Row 1: Leave a long end, then ch3, ss to close

Row 2: Ch3 in place of first dc, then 27 dc into ring, ss into 3rd of beginning ch (28dc)

Row 3: Ch4 in place of first dc and ch, (skip next dc, dc into next dc, ch1) to end, ss into 3rd of beginning ch (14 ch-1 spaces)

Row 4: Ch4 in place of first dc and ch, (dc1, ch1) 4 more times into 1st ch1-space, then (dc1, ch1) 5 times into each ch1-space to end, ss into 3rd of beginning ch (70dc)

Row 5: ch1, work 2sc into each ch1-space to end, ss into 1st ch (140sc)

Row 6: ch5, ss to 1st sc, (ch5, ss to next sc) to end, ss to base of 1st 5-ch (140 ch-5 spaces)

Sew in ends, using the cast-on end to sew a gorgeous bead or button into the centre. Attach to a pin, or sew onto a top, shawl or evening bag.